ADJUSTING THE CLUTCH ON KNUCKLEHEADS AND 74/80 FLATHEADS**
Checking and Adjusting Clutch Control
1940 and Earlier Models
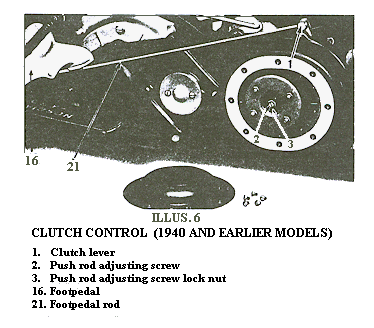
Refer to Illus. 6 for this procedure
With footpedal (16) in full disengaged position—
heel down, clutch lever (1) should stand about square
across top of transmission, with just a little clearance
from raised portion of transmission case cover. Adjust when found needed by lengthening or shortening foot-pedal rod (21). Following this adjustment,
set foot-pedal (16) in full engaged position—toe down,
loosen lock nut (3), and adjust screw (2) so that end
of lever (1) has about 1/8 inch free movement, back
and forward. Turn screw to right for less free movement; left for more.
CAUTION
If end of lever (1) has no free movement, clutch will not hold properly. If too much free movement is allowed, clutch will drag when in disengaged position, and consequently, transmission will shift hard, clash, and eventually become
damaged.

Checking and Adjusting Clutch Control
1941 to 1947 Models
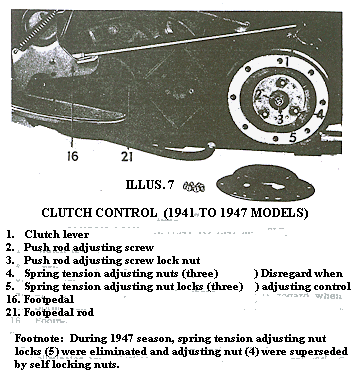
Refer to Illus. 7 for this procedure
Disengaging movement is limited by clutch lever
(1) striking transmission case cover. Rock footpedal
(16) to full disengaged position—heel down and observe clearance between footpedal rod end (front)and footpedal bearing cover. There should be clearance between them but just noticeable clearance.
Adjust as necessary by shortening or lengthening
rod (21). Following this adjustment, set footpedal
(16) in full engaged position—toe down, loosen lock
nut (3) and adjust screw (2) so that end of lever (1)
has about 1/8 inch free movement, back and forward.
Turn screw to right for less free movement; left for
more.
CAUTION
If end of lever (1) has no free movement, clutch will not hold properly. If too much free movement is allowed, clutch will drag when in disengaged position, and consequently, transmission will shift hard, clash, and eventually become
damaged.

Return to Clutch Index
**Copyright © 1986 Antique Cycle Supply Inc. USA


