ADJUSTING THE CLUTCH ON SHOVELHEADS**
If the clutch cable sleeve is adjusted to the maximum
limit and the clutch still does not operate properly,
perform the following adjustments.
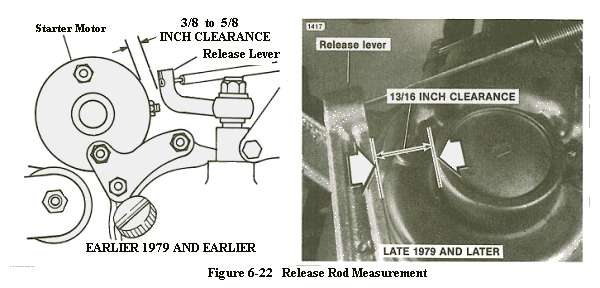
1. See Figure 6-22. Move the release lever forward as
far as it will go. Measure the clearance as shown. If
measurement is equal to the distance shown, proceed to Step 6.
If measurement is not equal, proceed with Steps 2 through 5.
2. See Figure 6-21. Loosen the locknut (2). Turn the
adjusting sleeve (1) all the way into the bracket (3).
 3. See Figure 6-23. Remove the clutch cover on the
primary cover. Loosen the push rod locknut (1) and
turn the screw (2) outward so there is no tension on
the push rod.
3. See Figure 6-23. Remove the clutch cover on the
primary cover. Loosen the push rod locknut (1) and
turn the screw (2) outward so there is no tension on
the push rod.
4. See Figure 6-21. Turn the adjusting sleeve (1) outward
until the proper measurement as shown
in Figure 6-22 is obtained. Tighten the locknut (2).
5. See Figure 6-23. Turn the screw (2) inward until
contact is made with the push rod, then back off
1/8 turn. Tighten the locknut (1).
If the clutch slips after performing Steps 1-5, proceed to
Step 6.
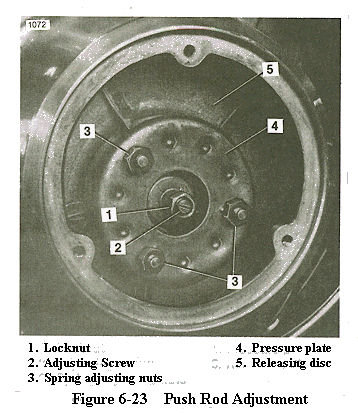
6. See Figure 6-23. Increase the tension on the spring
adjusting nuts (3) 1/2 turn at a time until clutch
holds. Test after each 1/2 turn by cranking the
engine with the rear wheel raised off the ground.
Do not increase spring tension any more than
necessary to make the clutch hold.
A new clutch is assembled so the distance from the
pressure plate edge (4, Figure 6-23) to the releasing disc
(5, Figure 6-23) is exactly 1-1/32 in. If springs are compressed
so this distance is 7/8 in. or less, the clutch will
probably not disengage.
7. Check the distance between the pressure plate
edge and releasing disc to make sure it is equal at
all points.
8. Perform Steps 1-5 again.
Return to Clutch Index
**Copyright © 1980 Harley Davidson, Inc.