1971 To 1978 Adjustments
1979 To 1984 Adjustments
1970 AND EARLIER CLUTCH ADJUSTMENT**
ADJUSTING CLUTCH RELEASE MECHANISM
(Figure 4-1)
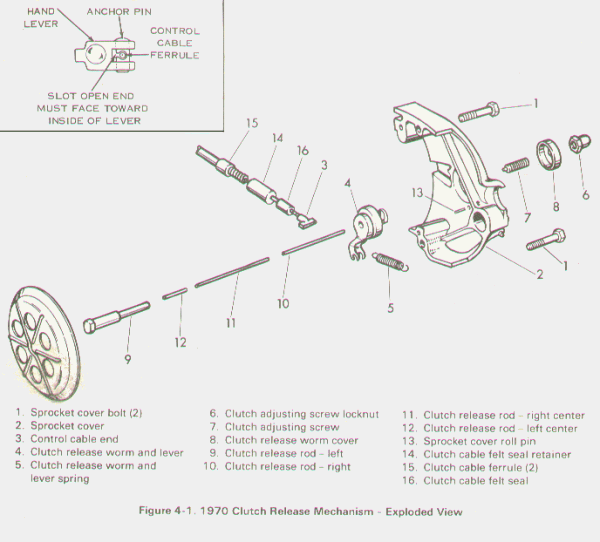
Loosen clutch release rod adjusting screw locknut (6) and
back off (counterclockwise) clutch release rod adjusting
screw (7). Clutch release worm (4) inside transmission
sprocket cover (2) should seat against its stop (13) when
clutch hand lever is in its fully extended position. If lever
does not fully seat, check to see if cable is binding in housing.
Adjust cable length byturning clutch cable adjusting sleeve
(hand lever end of cable housing) so that clutch releasing
worm does not quite return against its stop. This will hold
clutch hand lever in its fully extended position at all times.
Turn clutch release rod adjusting screw (7) inward until
clutch hand lever has 1/8 of its full movement free before
clutch starts to release. This can be checked by a slight in-
crease in tension on the clutch hand lever as it is being
moved to the released position. Tighten clutch release rod
adjusting screw locknut (6), without disturbing the setting
of the adjusting screw.
ADJUSTING CLUTCH SPRING TENSION
CAUTION
On Electric Start XLH Models, remove battery cover and
disconnect ground wire from battery (-)
terminal to prevent accidental starter operation.
Remove left footrest and rear brake foot lever. Place an oil drain pan
under clutch and remove front chain cover screws,cover
and gasket.
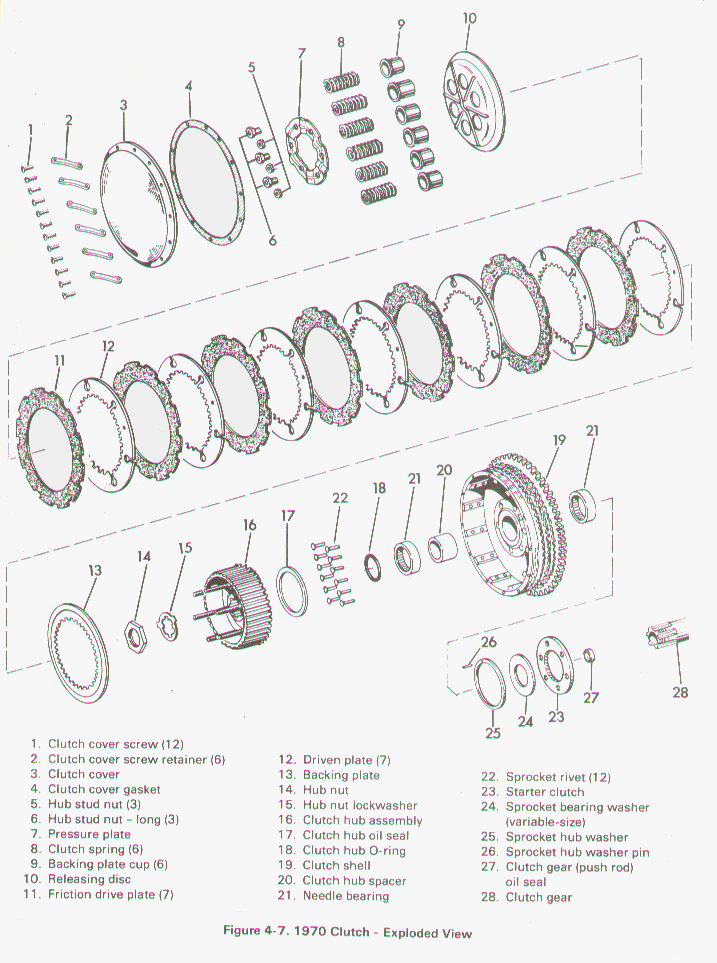
See Figure 4-7. Remove twelve clutch cover screws (1 ), six
retainers (2), clutch cover (3) and gasket (4).
Loosen cover evenly in several places. Do not pry cover
loose at one point as cover may be sprung out of shape and
will not be oil-tight when reassembled.
With clutch cover (3) removed, the clutch releasing disc
(10), clutch springs (8), spring tension adjusting plate (7)
and sixspring adjusting nuts are in view. Three of the spring
tension adjusting nuts (5) have 7/16 in. hex heads and
three nuts (6) have 1/2 in. hex heads. All spring tension ad-
justing nuts are recessed to conform to raised portion of
spring tension adjusting plate which provides a lock for the
nuts.
Tighten each of the six nuts one half turn at a time. The nuts
must always remain in their locked positions after adjustment is made.
Tightening the spring tension adjusting nuts moves the
spring tension adjusting plate (7) closer to the outside surface
of the clutch releasing plate (10). The inner surface of
the spring tension adjusting plate should measure 3/16 in.
from the outer surface of the flange on the clutch spring
cups (9) for normal clutch spring tension adjustment. When
increasing spring tension, do not diminish above distance to
less than 7/64 in. or clutch will not release.
Return to Clutch Index
**Copyright © 1970,1973,1985 Harley Davidson, Inc.